Location, Location, Location:
Everything you ever wanted to know about location scouting
Finding the right location for a shoot is always a challenge, no matter how much experience you have as a photographer, or how familiar you are with the area you’re scouting. There are multiple variables that determine if a location will serve as an appropriate setting for your shoot, which is what I’m here to discuss.
If your body of work relies on interesting locations as a backdrop for your images, it’s critical that you spend time finding new spots for future shoots. Part of your success as an on-location photographer (even if you shoot a combination of studio & location work) is being able to pull the right type of location out of your sleeve on short notice.
Here are some of my favorite tips for location scouting!
1. Train your eye: what makes a good location?
Depending on your style of photography, this answer will vary. However, I believe that regardless of your style, minimalism and contrast are always key to producing a compelling image. Negative space is crucial to drawing your eye to the subject, and a good location should offer you an opportunity to showcase your subject among minimal distractions and blank space.

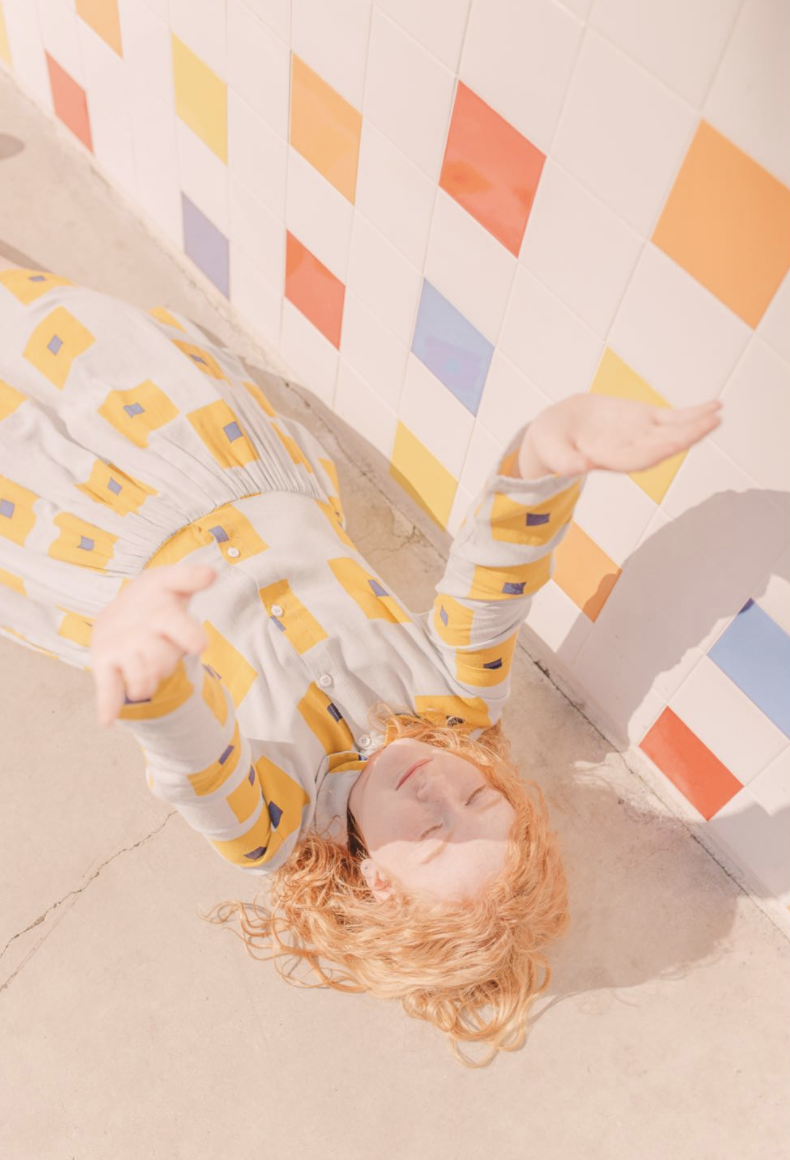
For me, I would add color, unique design, and a sense of timelessness. By that, I mean I want my photos to belong to different eras. Retro, or ultra-modern. But not your average 2000s suburb. Give me your 1950s suburbs, like Daly City’s Westlake or Palm Springs.
At the bare minimum, I need a blank canvas. A clean corner, a spotless wall, an open hillside. Wardrobe and props can always add pops of color or other elements of interest.
Typically, though, part of what makes my photography unique is the way I incorporate unusual or rarely seen settings into my images. I do somewhat rely on interesting locations as a basis for my image’s intrigue.

Secondary factors include:
-What type of light does this location get?
-Will it be bustling with people or cars or other distractions at the time of my shoot?
-Is it accessible? No point in adding that amazing arch cutout balcony to the list if I could never get a model up there.
-Can I alter the angle at which I’m capturing the photo to improve the composition? (shooting upward or straight down from up high can do wonders for a distracting location!)
-It’s not perfect, but could Photoshop fix its flaws? That “no parking” sign is probably an easy post-production fix, as long as it’s not intersecting with anything else in your scene
.Other things to look for:
Symmetry is important for balancing the composition.


Natural frames really highlight your subject.


Leading lines carve up the frame and add a sense of design and perspective.


Oddities, like a giant artichoke or a painted driveway, keep things interesting.


2. How to find new locations
Here are my favorite ways to find new locations:
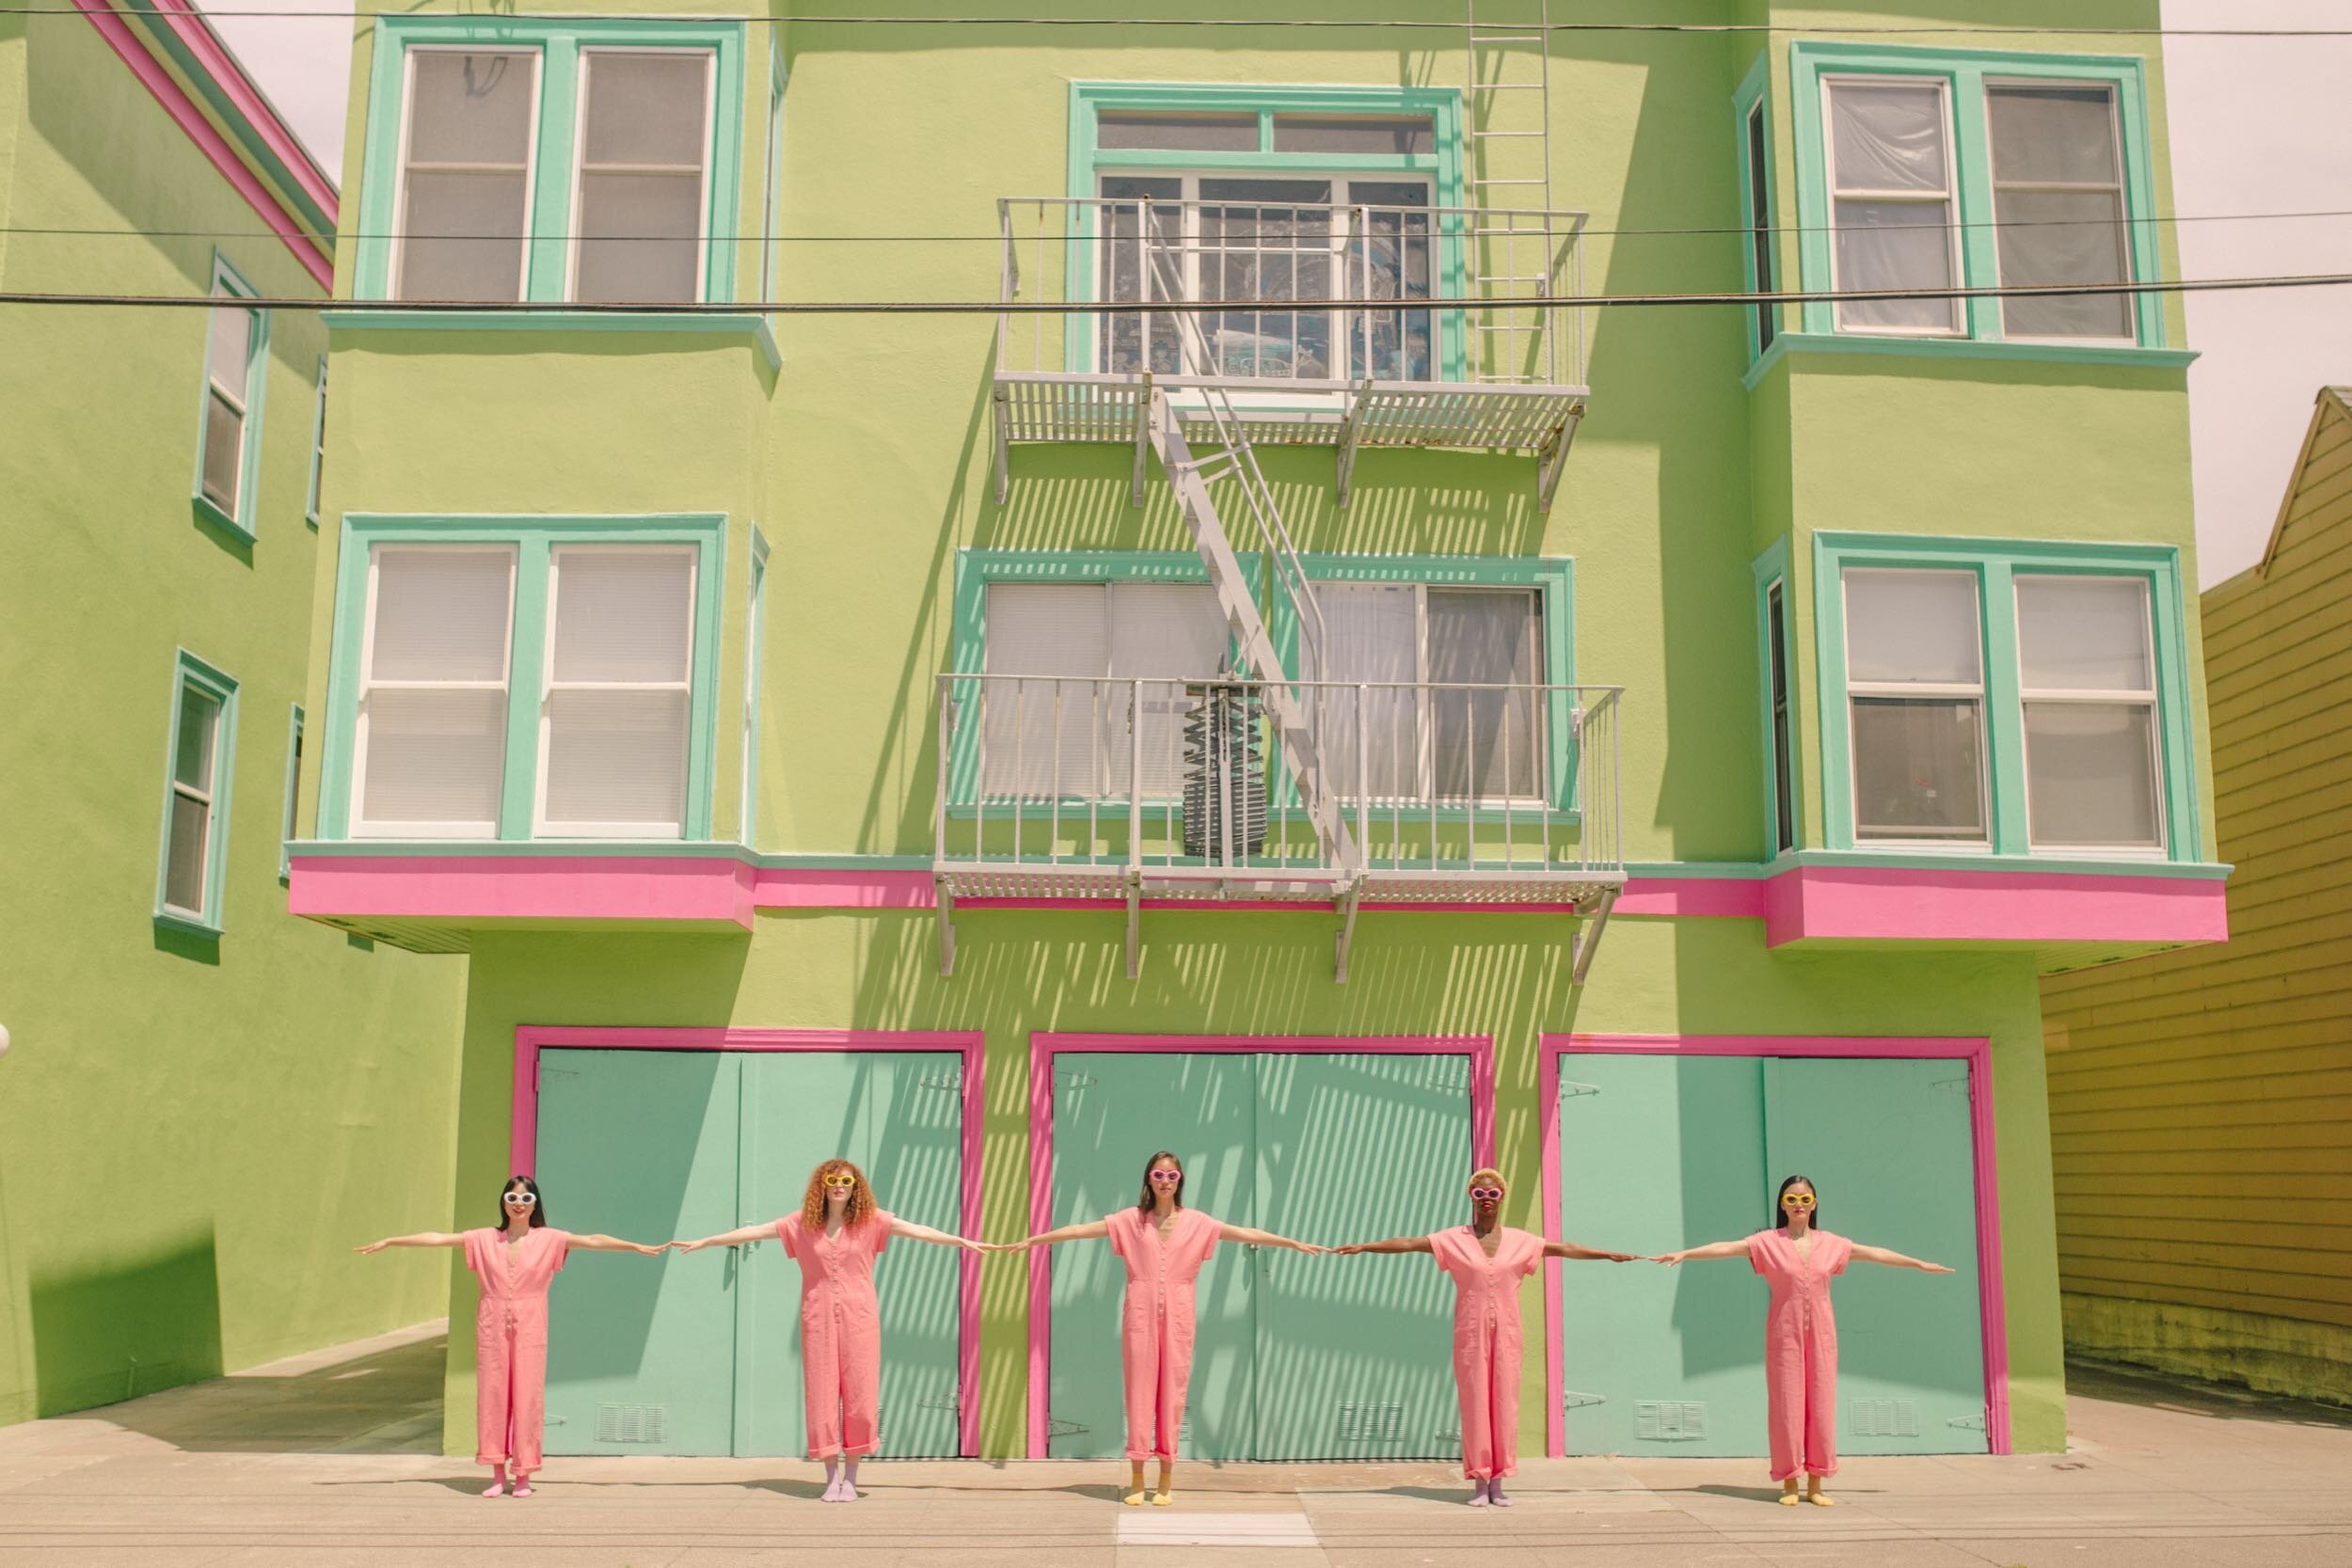
Keep your eyes peeled. Sounds obvious, right? But every outing is an opportunity to find a new location. Sometimes the best locations appear when you just happen to run across them. One time I was driving to an appointment in San Francisco, when I happened to pass a two-toned pink house. That ended up being the entire inspiration for my monochromatic fruit shoot. I find many of my locations this way. Be sure to record the location/address so you don’t forget it. I keep a note on my phone with this info.
Google Street View/3D View. This can be a great way to scout if you don’t drive or don’t have the time/energy to drive around. I rely on Google Street View a lot! Be sure to note the date the satellite or driveby imagery was captured, which appears at the bottom of the screen. If it’s really outdated, beware – things may not be current. “Star” potential locations so that they’re always marked on the map, in case you find yourself nearby. Street View is also helpful for verifying places you’ve found through other methods (like knowing the geographical orientation for light, or making sure the spot still exists). Once you have honed in on one location, scroll through the surrounding streets and find other spots you could hit in one shoot. Also check out bird’s eye view every once in a while to find colorful ground (courts, patterned pavement, street paintings). Always search for libraries, community centers, children’s museums, art museums, and universities, if you’re looking for colors and cool architecture.
Instagram. This takes a lot of patience, but Instagram can be really helpful for digital scouting. Try searching local hashtags (ex. #sanfrancisco, #sfphotographer, #sfblogger) or following other people in the area who shoot in the area you’re scouting (this also helps to find new models). Bloggers always seem to find good locations! There are also accounts devoted to cities & towns that post cool images of local places of interest, such as @365thingsaustin or @visitsantacruz. Be sure to “Save” any spots you come across, even if you don’t think you’ll ever be in that other state or other country. You just might find yourself bidding on a job in China or New Zealand!
Compilation lists. As much as I dislike the term “Instagrammable,” it comes in handy with Google searches (ex. “Most instagrammable places in Miami). You want to get specific to find less popular spots. “Examples of brutalist architecture in California” may yield buildings that no one ever realized would be cool for photos. “Tufa sandstone formations in California” or “Playgrounds by Helen Diller” were recent searches of mine. Keep track of specific categories, designers, architects, or phenomena that appeal to you. It’s also worth searching Google Images with any of these phrases because it’s easier to weed through the visuals.
Give yourself permission to improvise (a little). I don’t have many regrets in life, but I will ALWAYS regret not stopping at a cool location that I find mid-shoot. Those unexpected spots that weren’t on your list can yield your favorite images! If something catches your eye, follow that instinct and grab a few shots by it. Have a plan, but be open to detours.
3. Don’t be afraid to supplement with props.
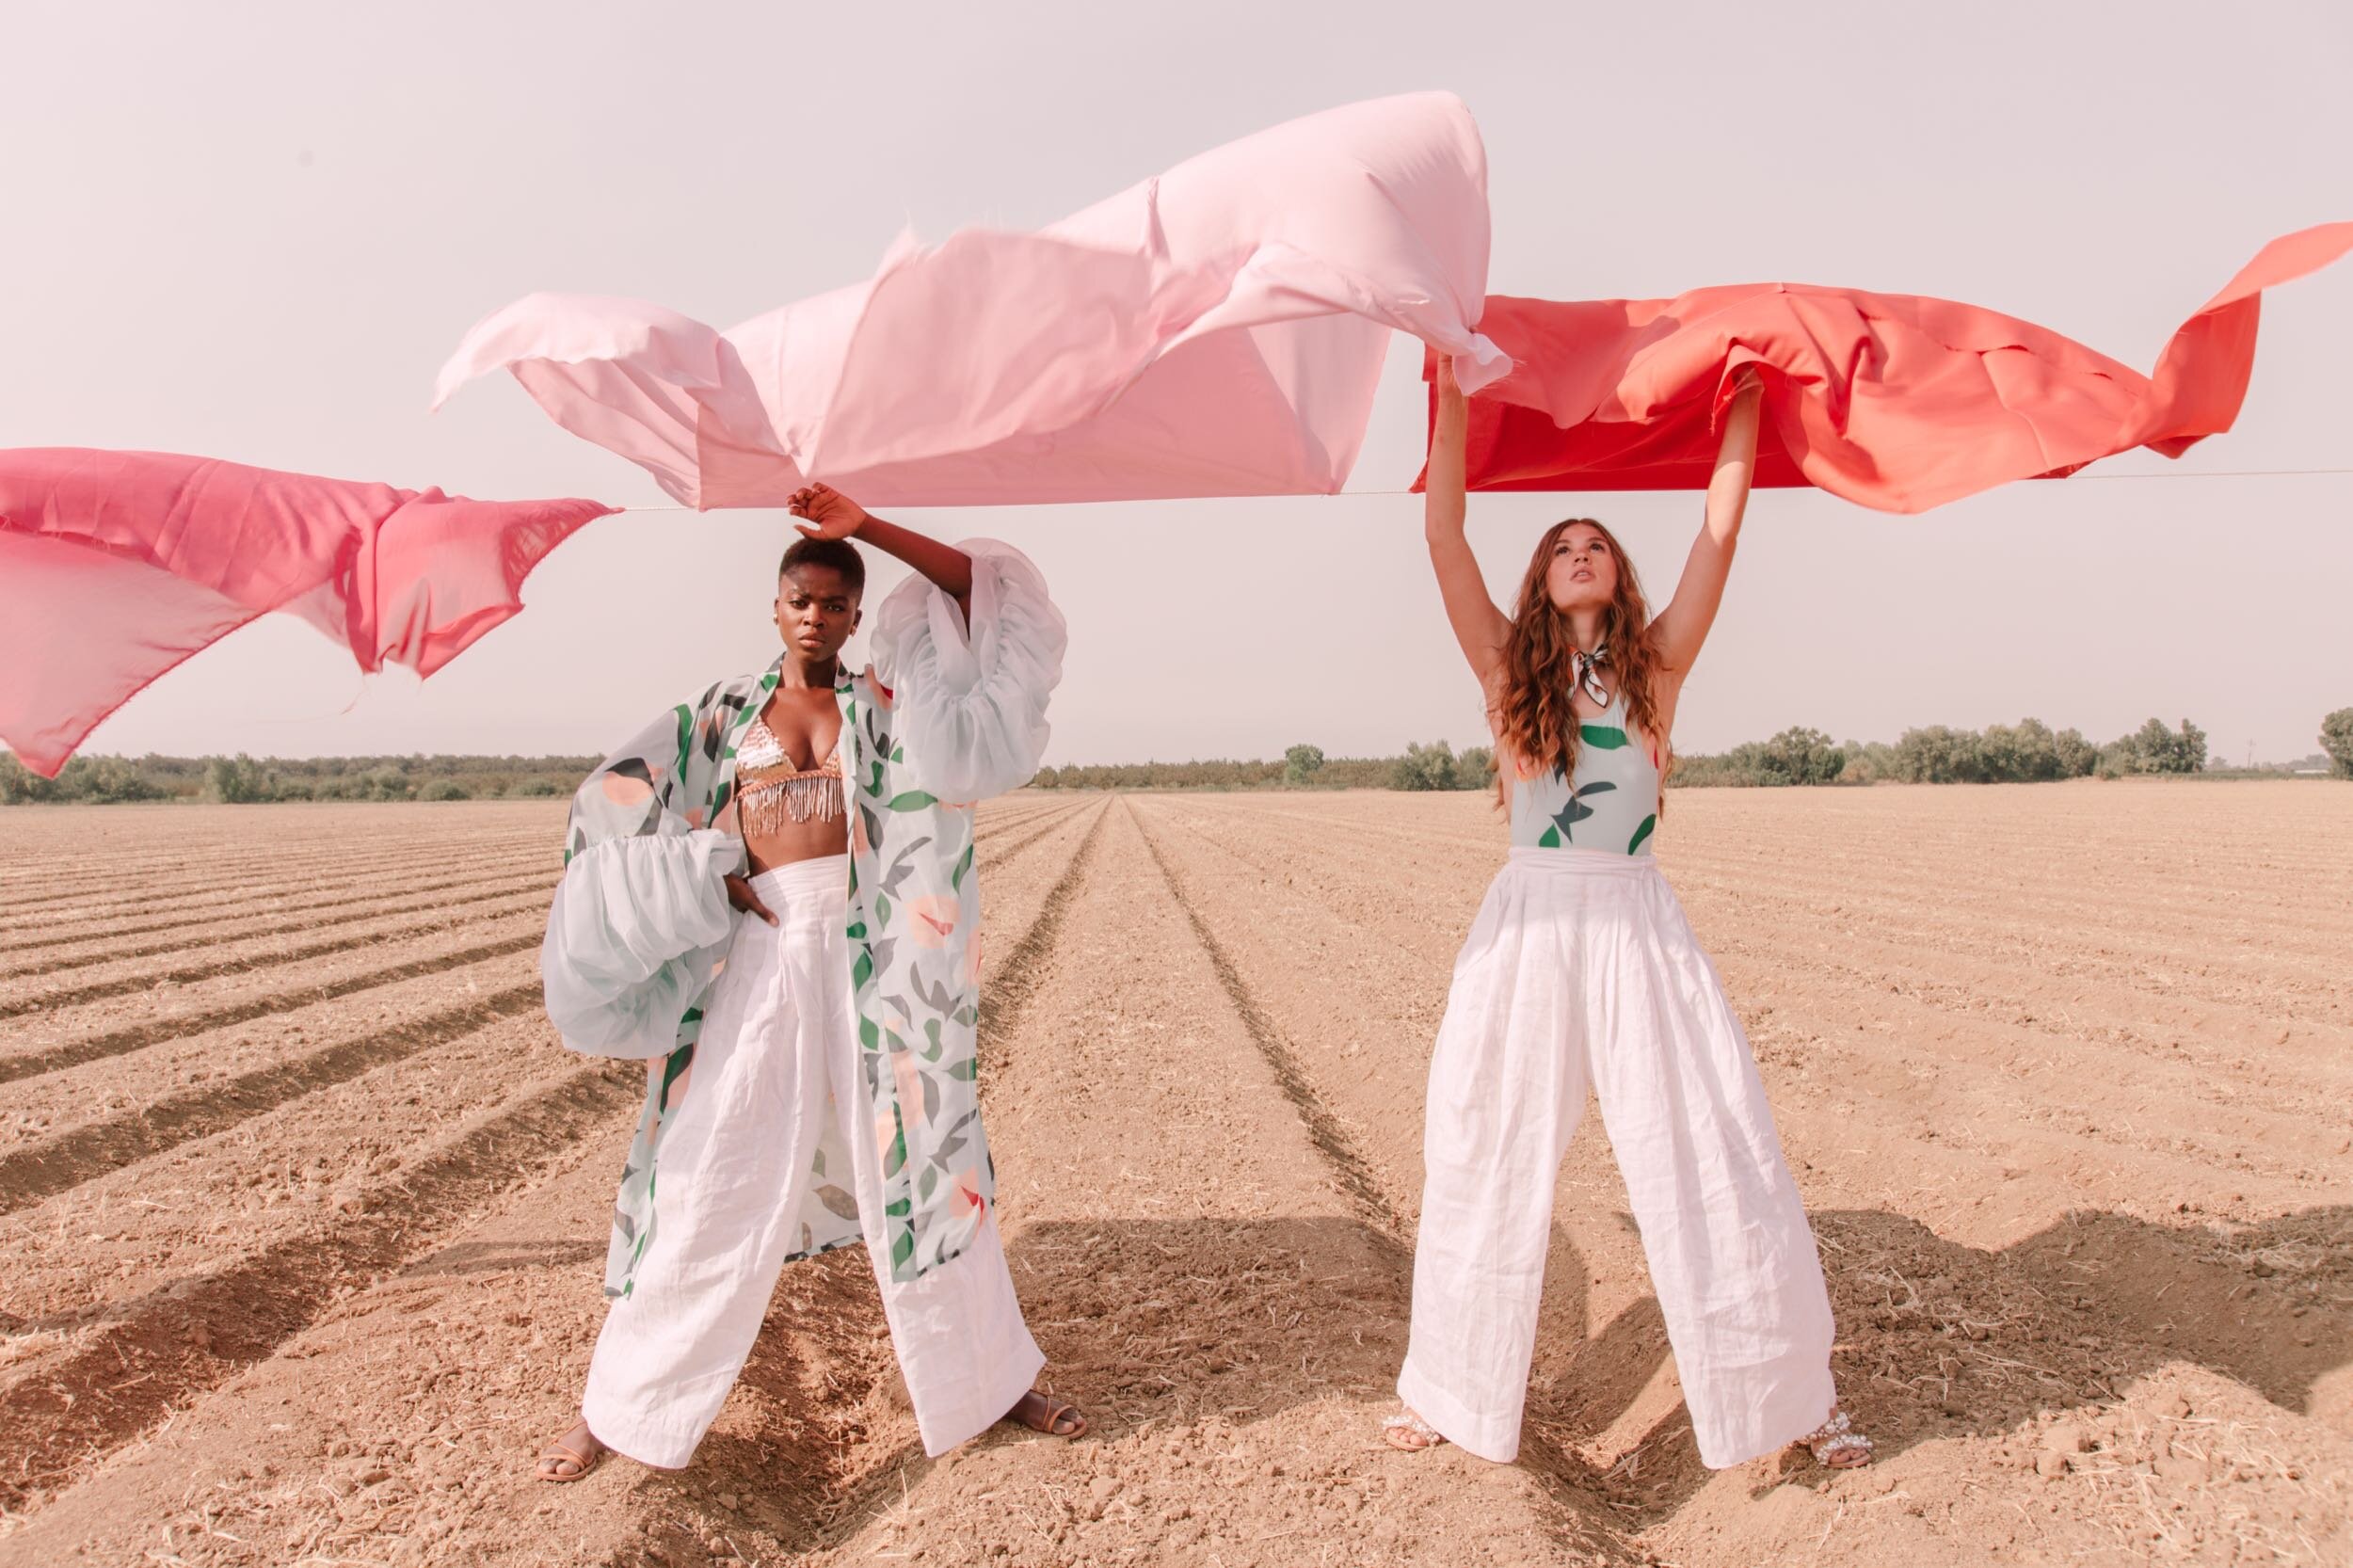
Props can take a location from meh to wow pretty easily. Going back to the idea of a blank slate, it’s always good to have a few spots in mind that offer the perfect foundation for more creative additions.
As you can see from the examples below, this is one of my specialties. Making ordinary locations extraordinary through pops of color and unexpected objects.
Example 1:
Add some beautiful swatches of fabric to a field of dirt.
Example 2:
From plain green field to colorblocking masterpiece!

Example 3:
Frisbees and fun styling make this racquetball court pop.

Example 4:
Open swatch of sand + colorful yoga balls = magic!

Example 5:
Add a painted ladder to a grassy hillside.

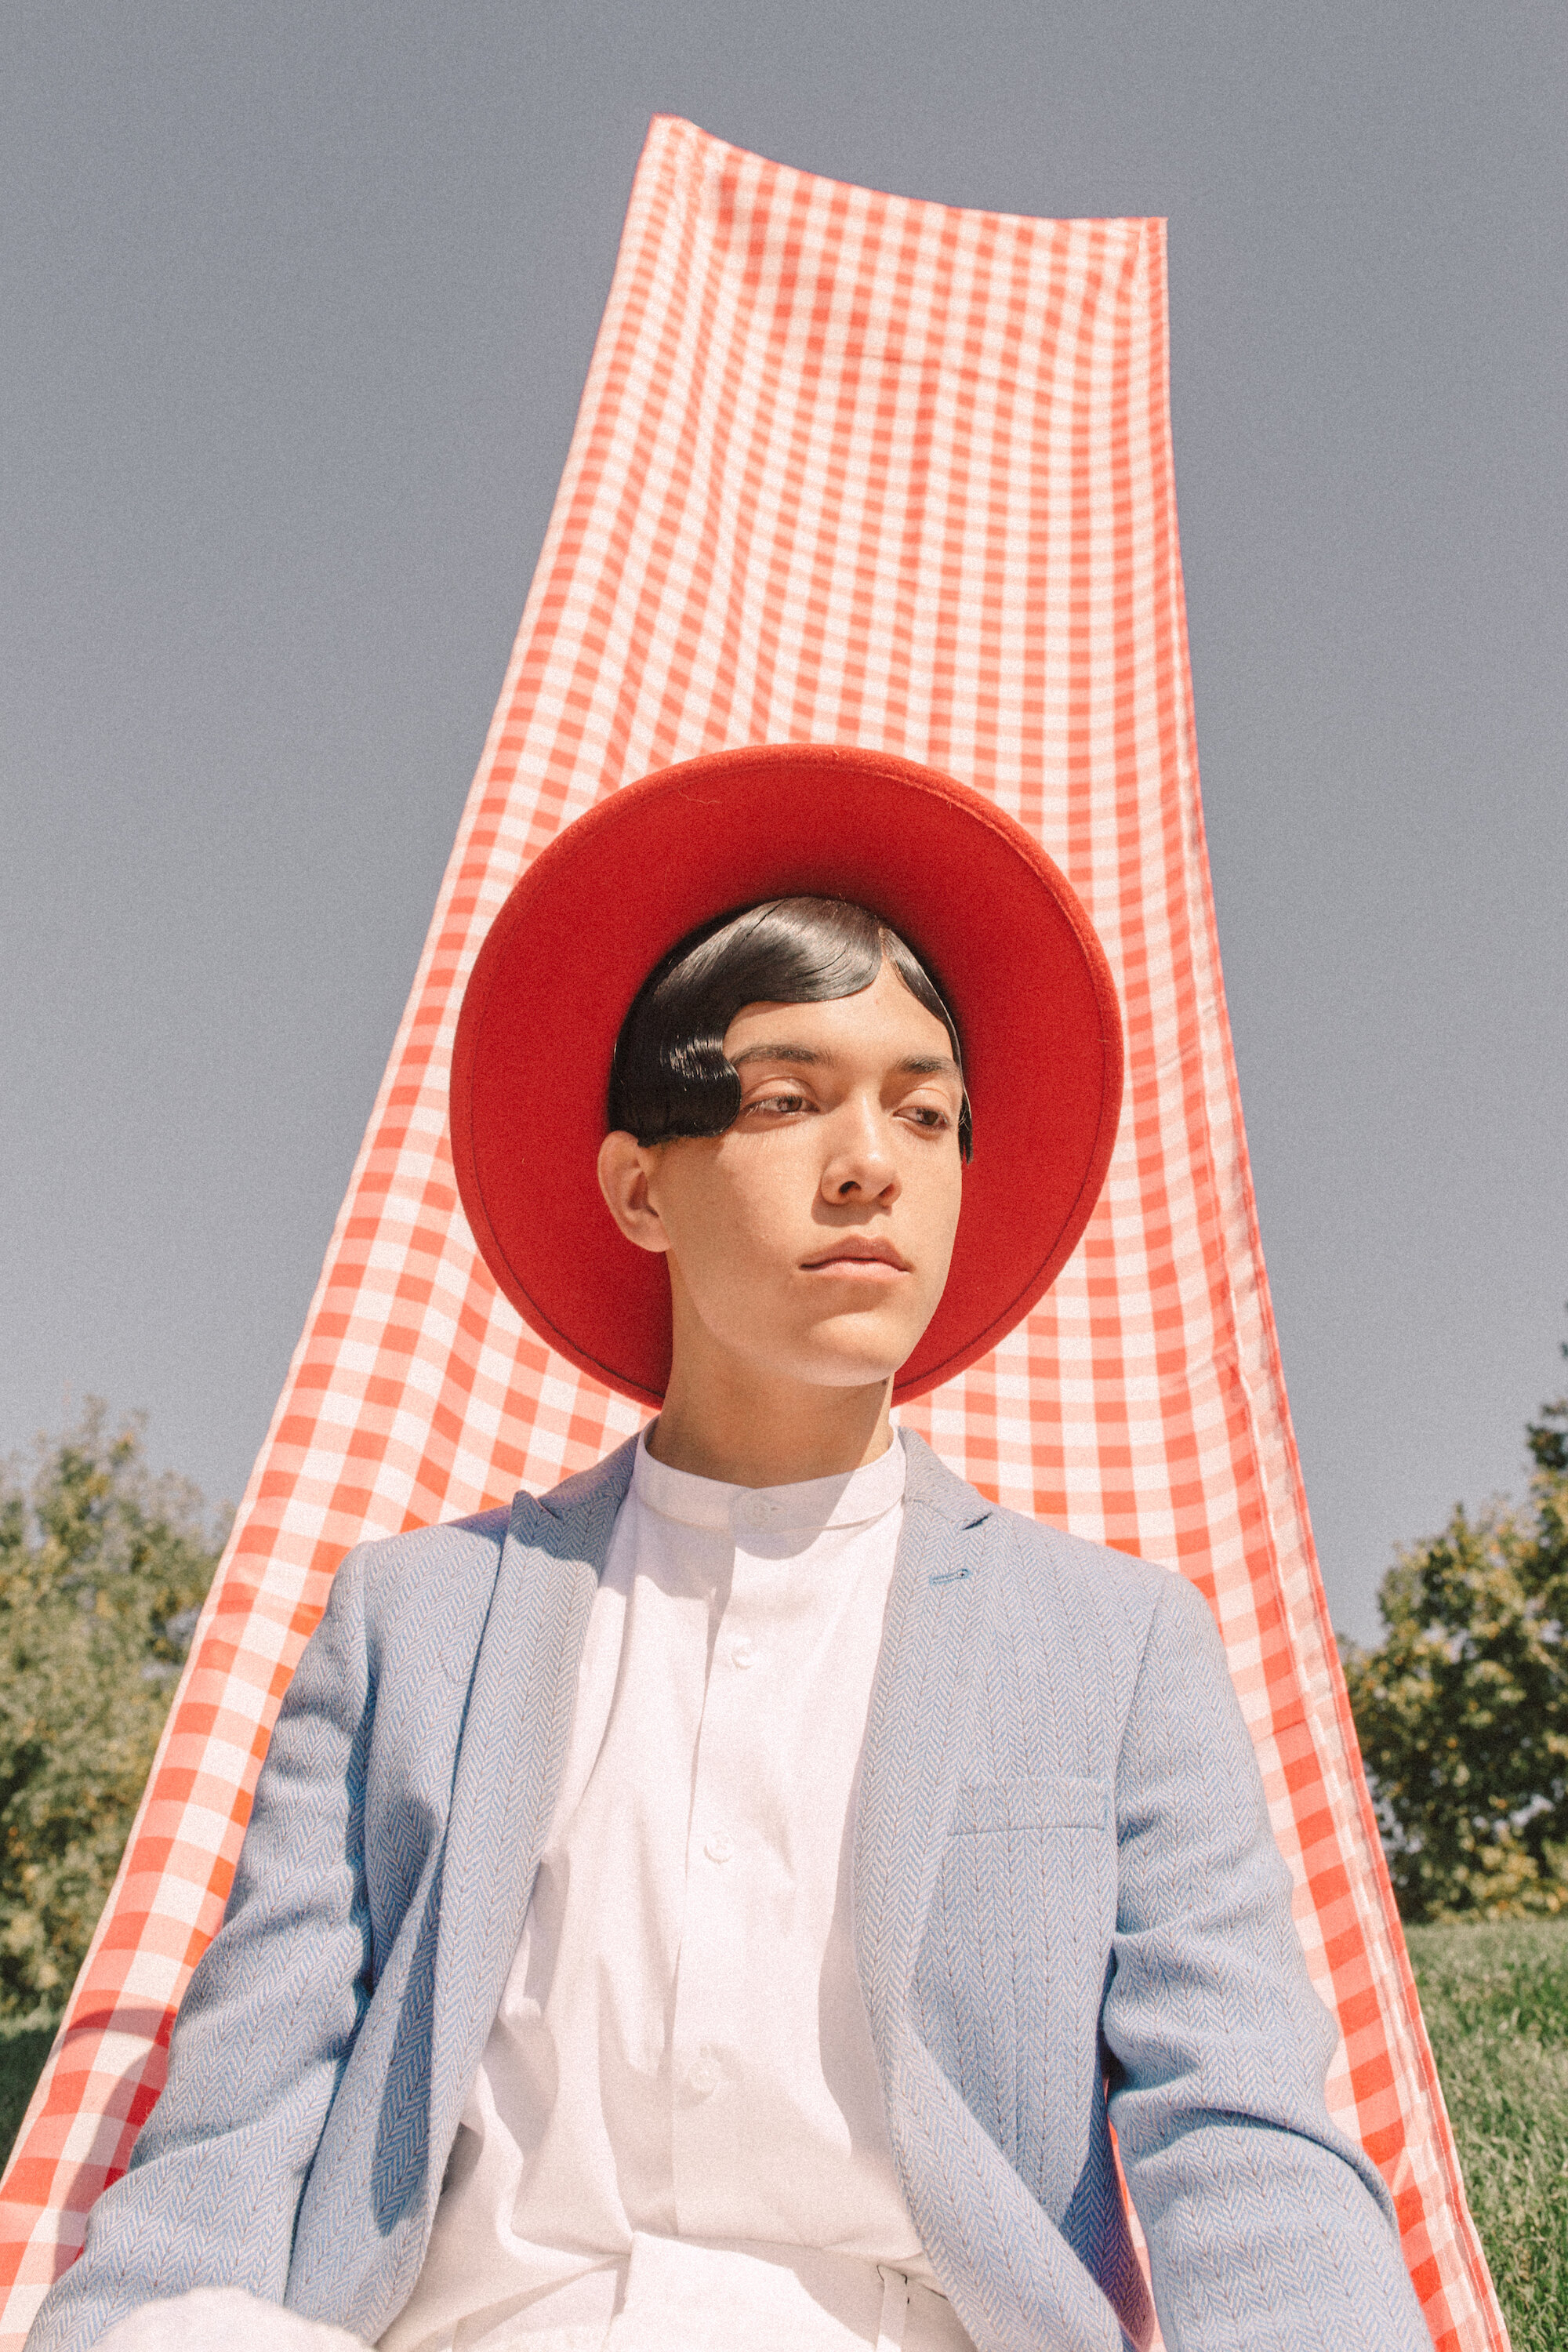
Example 6:
Local generic park converted into “magic carpet” picnic scene.

4. Think ahead; scout for diversity.
Something that you may not have considered is the importance of finding locations that may not suit your personal preferences, but may suit a client’s specific needs in the future.
You may hate the thought of shooting at a skatepark, but maybe you’re involved in a shoot that needs a really cool setting for skateboarding. I’ve had many shoots come up where they hire me because of my “aesthetic,” but then some of the themes they want to communicate break that aesthetic. Ultimately, they’re selling a product or service many different people with different visual preferences, so you need to be flexible.
When you’re scouting locations, don’t rule anything out. I mean, yeah, maybe rule out a boring grocery store parking lot or a super generic local park, but don’t be so quick to write off Grandma’s bathroom stuck in the 60s or the tiled exterior of a nearby In-N-Out – you never know. Be discerning but also open-minded.
Be ready to pull out the right location at the drop of a hat. You never know when you might need a pretty indoor pool, or a light-filled hotel lobby. Keep a database of different moods and types of settings, and update them every once in a while to verify they’re still current. Because your talent for photography isn’t always the only thing that separates you from other photographers bidding on the same job.

5. Permits and FOGKO (Fear of Getting Kicked Out)
FOGKO is real, but most of the time it’s unfounded. I’m not going to tell you, “Don’t worry about permits; it’s all fine and dandy.” But I will say that most of us don’t have the budget to obtain a permit for every shoot, especially casual personal shoots. And usually, it’s okay.
I’ve only been kicked out of a location once, and that was in front of an art museum in Barcelona. I’ve been given a verbal warning once at a park.
Use your discretion. If it’s just you and a model – and no major equipment – I wouldn’t worry too much. I don’t use modifiers or lights on location, so that could be why I’m usually not flagged down. If you have a big crew and tons of equipment, I wouldn’t risk having your whole shoot fail because you didn’t get a permit. In that case, it’s 100% worth it. Big commercial jobs should have the budget for location fees.
Most importantly be respectful of all locations, especially if they’re part of a sensitive ecosystem or historic landmark. Don’t exploit places of cultural significance. If someone asks you to leave, respect that. One disrespectful/obnoxious photographer easily ruins it for the rest of us.
6. PRIVATE LOCATIONS
Private locations are another option to consider for your shoot, depending on your needs and budget. Personally I have never gone up and knocked on someone’s door to ask if I could shoot in front of their house, but I know professional location scouts sometimes do that, especially if it has a key feature like a window the model could be sitting in or hanging out of and you need indoor access. I rarely use private locations unless it’s a photo studio. I have shot one farm-inspired lookbook shoot at a rustic wedding venue – the client communicated with the venue and worked out a deal.
Peerspace has private venues to rent, including photo studios, houses, mansions, lofts, yards, barns, etc. I’ve set up site visits with multiple spaces from Peerspace while scouting, but haven’t actually shot at a Peerspace location. It’s worth looking!
Also, don’t be afraid to ask for spaces within your network, or within local communities (interest groups, Facebook groups, etc). It’s courteous to offer a location fee for use of the space proportional to how long you’ll be there and how you’ll be using it.
Basically, private locations are usually a last resort for most shoots because they’re harder to find and most often cost money. However, the benefit of a private space is that you’ve explicitly been given permission to be there and you can relax without worry of getting kicked out.
7. Secrecy vs. Preservation
I try to be open about locations if someone asks – in fact, I have a blog post with some of my favorite locations in the Bay Area, intended for hobbyists – but my worst fear would be seeing these locations getting overrun by photographers/bloggers/anyone with a camera. This is especially true of nature spots (which aren’t as prominent in my work).
I say this more for the benefit of everyone’s enjoyment of these locations than personal secrecy/competition. Let’s all do our own exploring, avoid geo-tagging, and share secrets occasionally but leave some stones unturned!

HOT TIPS
#1 BLUE SKY
If all else fails, look for blue sky. Can you find an open enough space to shoot your subjects from below, against the sky? Big puffy clouds make this even more fun.

#2 KIDS HAVE ALL THE FUN
Don’t ask me why adults can’t have fun things, but places built for kids or young people often have the coolest architecture or colors. Pick a random children’s museum – I can almost guarantee you it has a cool exterior! Playgrounds, courts, amusement parks...they can all be colorful with interesting shapes or shadows to play with! Bear in mind these locations also come with their own concerns – obviously when kids are involved there are precautions to take, like making it obvious that you’re not there to secretly take photos of kids. Try to visit these places when very few or no kids are likely to be there, not only so you don’t disturb them but also so you have minimal distractions.